
Add and manage clients, sites and devices
Everything in ArkhiNet hangs off a three-level inventory: a client holds sites, and a site holds devices. The sidebar tree shows that hierarchy, and every connection, diagram and report starts from it.
If “client” and “site” don’t fit how you work, you can rename both levels on your PC. See Organize the inventory your way.
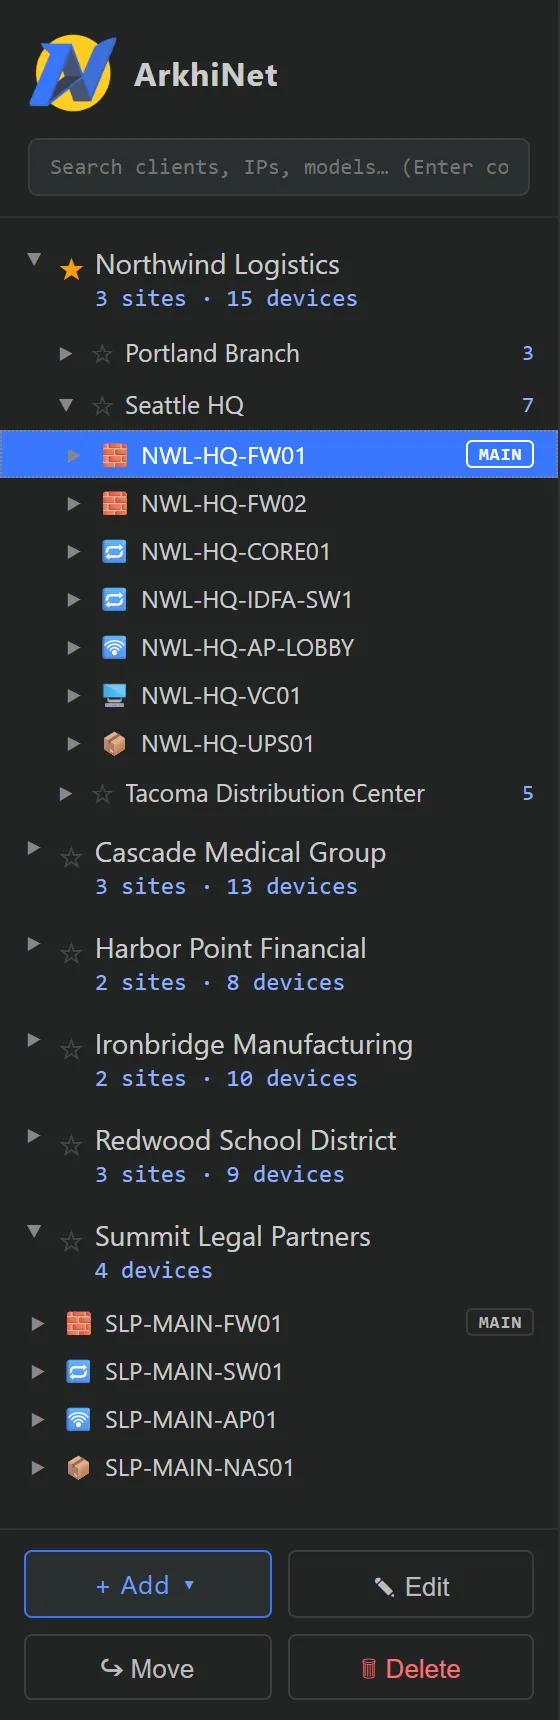
The sidebar tree
Section titled “The sidebar tree”Each client row shows its name and a count such as 3 sites · 15 devices. Sites show their device count, and devices show a type icon and their name.
- Click a row to select it. Click the ▶ caret, or double-click a client or site, to expand it. The tree starts collapsed every time you launch the app.
- Click ▶ next to a device to show its interfaces. Double-click a device (or press Enter) to connect to its active IP with its first SSH Launch Button.
- Use the arrow keys to move through the tree: ↑ and ↓ move, → expands, ← collapses.
- A MAIN badge marks the site’s main device. A small dot marks a device that has an open session.
- Press Ctrl+B to hide or show the sidebar. While it’s hidden, a breadcrumb bar under the tab strip has the same + Add ▾, ✎ Edit, ↪ Move and 🗑 Delete buttons.
Favorites
Section titled “Favorites”Click the ☆ next to a client or site to pin it. Pinned items show ★ and sort to the top, then everything else sorts alphabetically. Favorites are saved on your PC, not in the shared data file, so each engineer keeps their own.
Right-click actions
Section titled “Right-click actions”Right-click any row for its menu:
- Client: Edit, New site, Delete.
- Site: Edit, New device, Move…, Delete.
- Device: a CONNECT VIA box with the IP and its ⧉ copy button, the device’s Launch Buttons and Ping, then Edit, Set as main, File Transfer, Quick transfer (SCP)…, Move… and Delete. Open in WinSCP appears only when WinSCP is installed, and Open SSH tunnels only only when the device has tunnels turned on.
The buttons under the tree (✎ Edit, ↪ Move, 🗑 Delete) act on whichever level you clicked last.
Add a client
Section titled “Add a client”- Click + Add ▾ at the bottom of the sidebar, then Add Client.
- Enter the CLIENT NAME.
- Optionally set the other fields (see below).
- Click Save Client.
Client fields:
- STATUS: Active, Urgent, Pending or Inactive. The status is stored with the client, but the tree doesn’t display it. For a status you want to find later, use a tag.
- TAGS: type a tag and press Enter or click + Add. Click × on a tag to remove it. Tags are searchable.
- NOTES / PROJECT INFO: free text for contacts, contracts and escalation paths. It’s the same text as the client’s Notes tab. See Projects and notes.
- LINKS: a label and a URL, added with + Add.
- LAUNCH BUTTONS: keep Use Global or switch to Custom for this client. See Launch Buttons.
Add a site
Section titled “Add a site”- Right-click the client and choose New site. You can also click + Add ▾, then Add Site, and pick the client from the CLIENT dropdown.
- Enter the SITE NAME, for example
Seattle HQ. - Optionally add TAGS, SITE NOTES and the site’s Launch Buttons.
- Click Add Site.
If you leave the client blank in the + Add ▾ route, the site goes into a client called default. Rename that client later and it becomes a normal client.
Add a device
Section titled “Add a device”- Right-click the site and choose New device. You can also click + Add ▾, then Add Device, and pick the CLIENT and SITE.
- Fill in the device fields (see below). Only the name is required.
- Click Add Device.
If you pick a client but no site, the device goes to the client’s first site, or to a new site called Main if the client has none. With no client at all, it goes to default › Main.
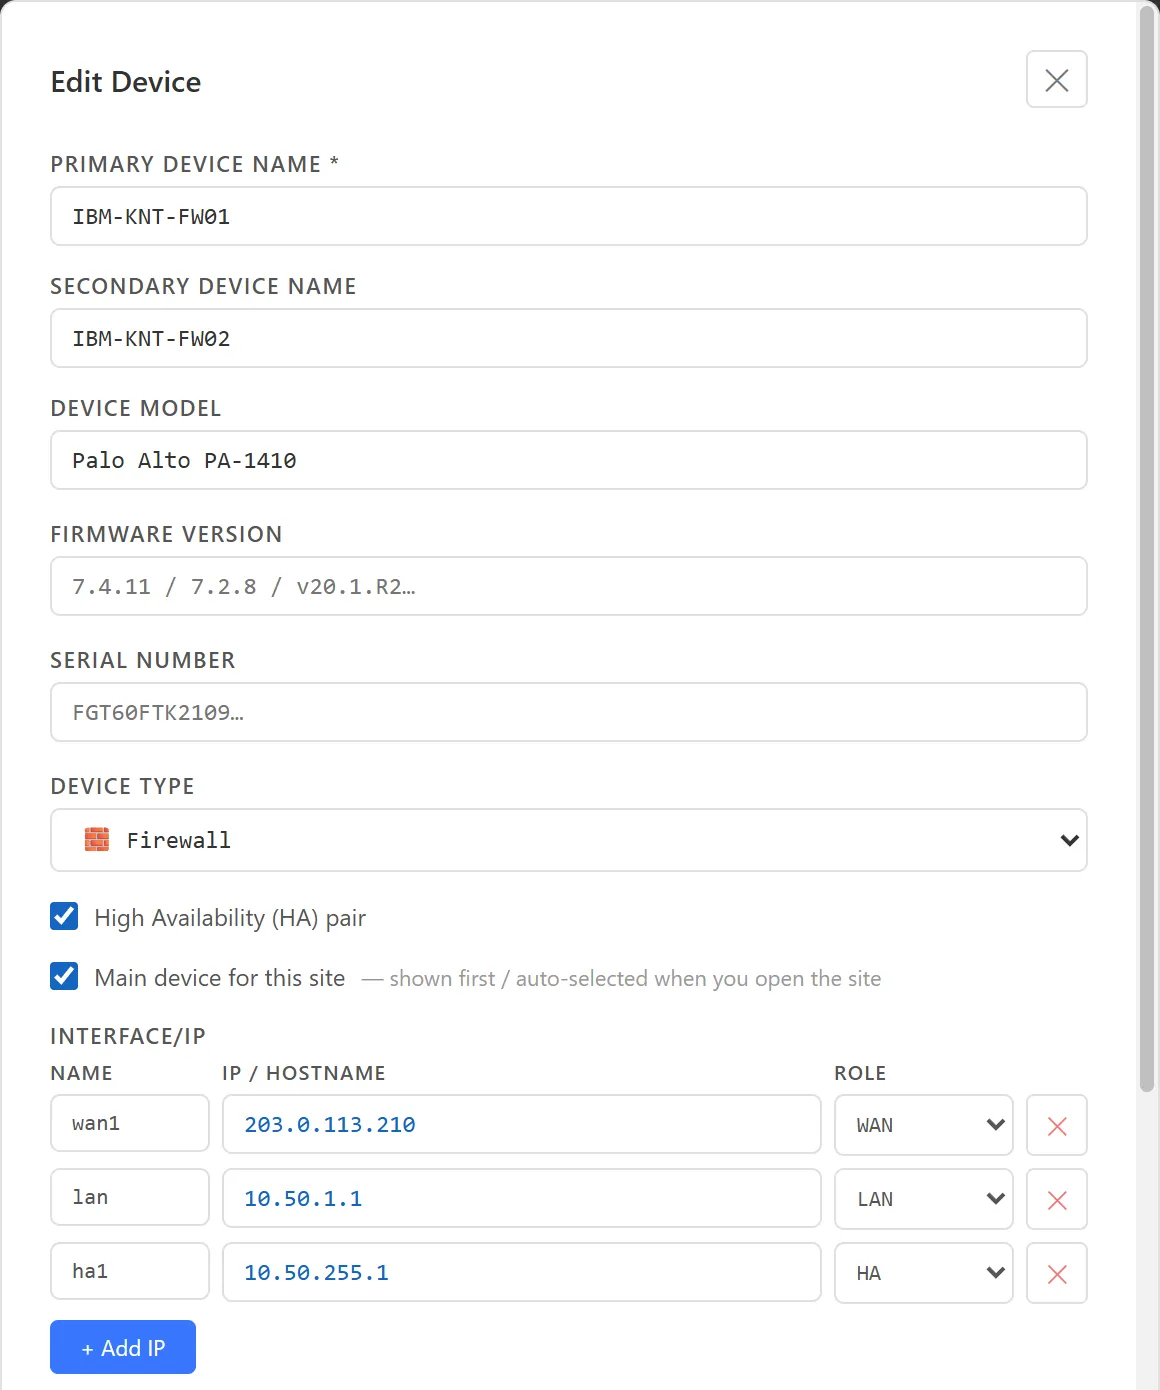
Device fields
Section titled “Device fields”- DEVICE NAME, for example
NWL-HQ-FW01. - DEVICE MODEL, for example
FortiGate 100F. For Fortinet models this drives the End-of-Support date. - FIRMWARE VERSION and SERIAL NUMBER. The serial shows on the device card as
SN ...when details are on. - DEVICE TYPE: Firewall, Router, Switch, Access Point, Server or Other. It sets the icon in the tree and on cards.
- High Availability (HA) pair: tick this when one record stands for two physical units. The name field becomes PRIMARY DEVICE NAME, a SECONDARY DEVICE NAME box appears, and an
hainterface row is added for you. Topology draws both units side by side. - Main device for this site: tick this to make the device the site’s headline device, shown first and selected automatically when you open the site.
- INTERFACE/IP: one row per interface. See Interfaces and IP addresses.
- TAGS and NOTES. Device notes don’t appear on the device card, but search finds them.
- LAUNCH BUTTONS and the per-PC connection options. See Launch Buttons.
The first device you add to a site becomes its main device automatically. To change it later, right-click another device and choose Set as main.
Edit any level
Section titled “Edit any level”- Select the client, site or device in the tree.
- Click ✎ Edit under the tree, or right-click the row and choose Edit.
- Change the fields, then click Save Client, Save Site or Save Device.
If you close an edit dialog with unsaved changes, ArkhiNet asks Discard your changes? first. Choose Keep editing to go back.
Move a site or device
Section titled “Move a site or device”You can move a device to another site (in any client) and a site to another client. Clients can’t be moved.
- Right-click the site or device and choose Move…. You can also select it and click ↪ Move, or click → Move… inside its edit dialog.
- Pick the DESTINATION CLIENT, and for a device the DESTINATION SITE.
- Click Move.
A device keeps all its fields when it moves. If it was the main device of its old site, that site’s first remaining device takes over.
Delete a client, site or device
Section titled “Delete a client, site or device”- Right-click the row and choose Delete, or select it and click 🗑 Delete.
- Confirm in the dialog.